I discovered yesterday a super easy, free way to make one of those netted-looking produce bags that are beginning to pop up as the alternative to using the clear plastic bags you get in the produce section at the grocery store. I always feel guilty for using those plastic ones and then just throwing them away.I don't think you can recycle them. I was delighted to find another way to reduce my use of non-renewable materials and use up some old t-shirts that were yucky and stained instead of throwing them away!
You got it- I'm gonna show you how to make a bag made out of a t-shirt. Super simple.
Here is where I got the idea, and if you need better pictures they definitely have them. Photography is not my strongest suit! ;)
I modified the method, however...so here is my version of the up-cycled t-shirt produce bag:
~Find an old t-shirt or a few if you want a bunch of bags.
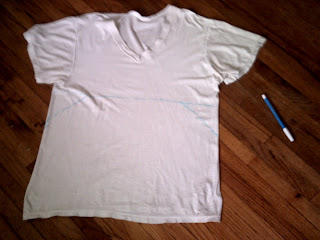
~Turn it inside out.
 |
| there are lines on there, if you can see them.. |
 |
| I was going to just make a straight-bottomed bag, but changed my mind. That's why there is that V-shape on there. |
~Cut out your bag.
~Go to the sewing machine and sew a basic stitch along the curved part, what will be the bottom of your bag. Follow that up with a zig-zag stitch to hold the raw edges together.
| Like my nice zig zag stitch? I"m still learning...:) At least it will be on the inside, right? |
~Mark about 1 or 2 inch holes in lines along the bag, making sure that you alternate in rows where you place your holes. Otherwise you'll end up with a huge hole and your produce will fall out!
 |
| That top longer line is my handle hole. I recommend making it a little higher, towards the top.. |
~Cut your holes. I used a rotary cutter because I thought it would be easier, but you could use scissors as well. Cut both layers of your shirt bag so you have holes on both sides.
~ Turn the t-shirt right side out and stretch the bag to open up the holes! That's it!
Since I used white t-shirts, my bag kind of ended up looking like Granny's old underwear..can I say....gross!
I decided to dye it. :)
I simply used food coloring. Blue is one of my favorite colors, so I went with that.
| Ignore the dried coffee spill left over from this morning .... |
I used about 1/4 of the little bottle of food coloring and put it into a large pot with my bag. (I didn't measure, this is just a guess. Just go with what looks good. )
Then I added a little water, just to spread all of the food coloring around and help saturate the bag. I "cooked" the bag on med- low heat for around 20 minutes, stirring every once in a while so that it didn't burn.
Then I removed the bag, wrung it out and stuck it in the dryer for around 50 minutes. When the bag was dry, it wasn't as darkly colored as I wanted, but it is still kind of cool-looking in a tye-dyed kind of way. Obviously you could avoid this by just using a colored shirt for your bag, but I had a lot of fun experimenting to figure out what kind of color I could get.
| I'm so excited to take this to the market next time I go! |
Another tip- if you do end up dyeing your bag, I recommend using gloves to handle it when you take it out of the pan- my hands turned blue and I"m having trouble getting it off!
| Yay, blue hands.....! |


No comments:
Post a Comment